一、设置Geometry顶点位置、顶点颜色数据

几何体
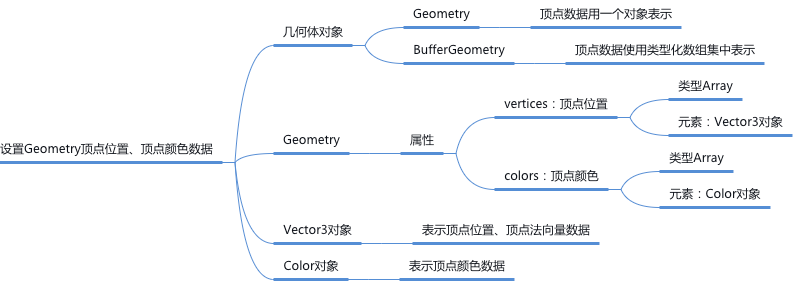
Geometry和缓冲类型几何体BufferGeometry表达的含义相同, 只是对象的结构不同,three.ts渲染的时候会先把Geometry转化为BufferGeometry再解析几何体顶点数据进行渲染。
- 新版中已经放弃使用 Geometry 来构建几何体【了解即可】
- 推荐使用 BufferGeometry 代替,
1. Vector3定义顶点位置坐标数据
Vector3是three.ts的三维向量对象,可以通过Vector3对象表示一个顶点的xyz坐标,顶点的法线向量。- 几何体
Geometry的顶点位置属性geometry.vertices和缓冲类型几何体BufferGeometry顶点位置属性BufferGeometry.attributes.position是对应的。javascriptconst geometry = new THREE.Geometry(); //声明一个几何体对象Geometry const p1 = new THREE.Vector3(50, 0, 0); //顶点1坐标 const p2 = new THREE.Vector3(0, 70, 0); //顶点2坐标 const p3 = new THREE.Vector3(80, 70, 0); //顶点3坐标 //顶点坐标添加到geometry对象 geometry.vertices.push(p1, p2, p3); - 代码示例html
<!DOCTYPE html>
<html lang="en">

<head>
  <meta charset="UTF-8">
  <title>Vector3定义顶点数据</title>
  <style>
    body {
      margin: 0;
      /* 隐藏body窗口区域滚动条 */
      overflow: hidden;
    }
  </style>
    <script src="../../../../js/three.js"></script>
    <!-- 引入 three.ts 扩展控件 OrbitControls.js -->
    <script src="../../../../js/OrbitControls.js"></script>
</head>

<body>
  <script>
    /**
     * 创建场景对象Scene
     */
    const scene = new THREE.Scene();
    /**
     * 创建网格模型
     */
    const geometry = new THREE.Geometry(); //声明一个几何体对象Geometry

    const p1 = new THREE.Vector3(50, 0, 0); //顶点1坐标
    const p2 = new THREE.Vector3(0, 70, 0); //顶点2坐标
    const p3 = new THREE.Vector3(80, 70, 0); //顶点3坐标
    //顶点坐标添加到geometry对象
    geometry.vertices.push(p1, p2, p3);

    //材质对象
    const material = new THREE.LineBasicMaterial({
      color: 0xffff00
    });
    //线条模型对象
    const line = new THREE.Line(geometry, material);
    scene.add(line); //线条对象添加到场景中

    // 点渲染模式
    // const material = new THREE.PointsMaterial({
    //   color: 0xff0000,
    //   size: 5.0 //点对象像素尺寸
    // }); //材质对象
    // const points = new THREE.Points(geometry, material); //点模型对象
    // scene.add(points); //点对象添加到场景中

    // 辅助坐标系
    const AxesHelper = new THREE.AxesHelper(250);
    scene.add(AxesHelper);
    /**
     * 光源设置
     */
    //点光源
    const point = new THREE.PointLight(0xffffff);
    point.position.set(400, 200, 300); //点光源位置
    scene.add(point); //点光源添加到场景中
    //环境光
    const ambient = new THREE.AmbientLight(0x444444);
    scene.add(ambient);
    /**
     * 相机设置
     */
    const width = window.innerWidth; //窗口宽度
    const height = window.innerHeight; //窗口高度
    const k = width / height; //窗口宽高比
    const s = 150; //三维场景显示范围控制系数,系数越大,显示的范围越大
    //创建相机对象
    const camera = new THREE.OrthographicCamera(-s * k, s * k, s, -s, 1, 1000);
    camera.position.set(200, 300, 200); //设置相机位置
    camera.lookAt(scene.position); //设置相机方向(指向的场景对象)
    /**
     * 创建渲染器对象
     */
    const renderer = new THREE.WebGLRenderer();
    renderer.setSize(width, height); //设置渲染区域尺寸
    renderer.setClearColor(0xb9d3ff, 1); //设置背景颜色
    document.body.appendChild(renderer.domElement); //body元素中插入canvas对象

    // 渲染函数
    function render() {
      renderer.render(scene, camera); //执行渲染操作
    }
    render();
    //创建控件对象  相机对象camera作为参数   控件可以监听鼠标的变化,改变相机对象的属性
    const controls = new THREE.OrbitControls(camera,renderer.domElement);
    //监听鼠标事件,触发渲染函数,更新canvas画布渲染效果
    controls.addEventListener('change', render);
  </script>

</body>

</html>
2. Color定义顶点颜色数据
- 通过
three.ts顶点颜色对象Color可以定义几何体顶点颜色数据, 然后顶点颜色数据构成的数组作为几何体Geometry顶点颜色属性geometry.colors的值。 - 几何体
Geometry的顶点颜色属性geometry.colors和缓冲类型几何体BufferGeometry顶点颜色属性BufferGeometry.attributes.color是对应的。javascript// Color对象表示顶点颜色数据 const color1 = new THREE.Color(0x00ff00); //顶点1颜色——绿色 const color2 = new THREE.Color(0xff0000); //顶点2颜色——红色 const color3 = new THREE.Color(0x0000ff); //顶点3颜色——蓝色 //顶点颜色数据添加到geometry对象 geometry.colors.push(color1, color2, color3);
-注意设置几何体Geometry顶点颜色属性geometry.colors,对网格模型Mesh是无效的,对于点模型Points、线模型Line是有效果。
3. 材质属性.vertexColors
- 注意使用顶点颜色数据定义模型颜色的时候,要把材质的属性
vertexColors设置为THREE.VertexColors,这样顶点的颜色数据才能取代材质颜色属性.color起作用。javascript//材质对象 const material = new THREE.LineBasicMaterial({ // 使用顶点颜色数据渲染模型,不需要再定义color属性 // color: 0xff0000, vertexColors: THREE.VertexColors, //以顶点颜色为准 side: THREE.DoubleSide, //两面可见 }); - 代码示例html
<!DOCTYPE html>
<html lang="en">

<head>
  <meta charset="UTF-8">
  <title>定义顶点颜色数据</title>
  <style>
    body {
      margin: 0;
      /* 隐藏body窗口区域滚动条 */
      overflow: hidden;

    }
  </style>
  <!--引入three.js三维引擎-->
  <script src="http://www.yanhuangxueyuan.com/versions/threejsR92/build/three.js"></script>
  <!-- 引入threejs扩展控件OrbitControls.js -->
  <script src="http://www.yanhuangxueyuan.com/versions/threejsR92/examples/js/controls/OrbitControls.js"></script>
</head>

<body>
  <script>
    /**
     * 创建场景对象Scene
     */
    const scene = new THREE.Scene();
    /**
     * 创建网格模型
     */
    const geometry = new THREE.Geometry(); //声明一个几何体对象Geometry

    // Vector3向量对象表示顶点位置数据
    const p1 = new THREE.Vector3(50, 0, 0); //顶点1坐标
    const p2 = new THREE.Vector3(0, 70, 0); //顶点2坐标
    const p3 = new THREE.Vector3(80, 70, 0); //顶点3坐标

    //顶点坐标添加到geometry对象
    geometry.vertices.push(p1, p2, p3);
    // Color对象表示顶点颜色数据
    const color1 = new THREE.Color(0x00ff00); //顶点1颜色——绿色
    const color2 = new THREE.Color(0xff0000); //顶点2颜色——红色
    const color3 = new THREE.Color(0x0000ff); //顶点3颜色——蓝色
    //顶点颜色数据添加到geometry对象
    geometry.colors.push(color1, color2, color3);

    //材质对象
    const material = new THREE.LineBasicMaterial({
      // 使用顶点颜色数据渲染模型,不需要再定义color属性
      // color: 0xff0000,
      vertexColors: THREE.VertexColors, //以顶点颜色为准
      side: THREE.DoubleSide, //两面可见
    });
    //线条模型对象
    const line = new THREE.Line(geometry, material);
    scene.add(line); //线条对象添加到场景中

    // 点渲染模式
    // const material = new THREE.PointsMaterial({
    //   // 使用顶点颜色数据渲染模型,不需要再定义color属性
    //   // color: 0xff0000,
    //   vertexColors: THREE.VertexColors, //以顶点颜色为准
    //   size: 10.0 //点对象像素尺寸
    // }); //材质对象
    // const points = new THREE.Points(geometry, material); //点模型对象
    // scene.add(points); //点对象添加到场景中

    // 辅助坐标系
    const AxesHelper = new THREE.AxesHelper(250);
    // scene.add(AxesHelper);
    /**
     * 光源设置
     */
    //点光源
    const point = new THREE.PointLight(0xffffff);
    point.position.set(400, 200, 300); //点光源位置
    scene.add(point); //点光源添加到场景中
    //环境光
    const ambient = new THREE.AmbientLight(0x444444);
    scene.add(ambient);
    /**
     * 相机设置
     */
    const width = window.innerWidth; //窗口宽度
    const height = window.innerHeight; //窗口高度
    const k = width / height; //窗口宽高比
    const s = 150; //三维场景显示范围控制系数,系数越大,显示的范围越大
    //创建相机对象
    const camera = new THREE.OrthographicCamera(-s * k, s * k, s, -s, 1, 1000);
    camera.position.set(200, 300, 200); //设置相机位置
    camera.lookAt(scene.position); //设置相机方向(指向的场景对象)
    /**
     * 创建渲染器对象
     */
    const renderer = new THREE.WebGLRenderer();
    renderer.setSize(width, height); //设置渲染区域尺寸
    renderer.setClearColor(0xb9d3ff, 1); //设置背景颜色
    document.body.appendChild(renderer.domElement); //body元素中插入canvas对象

    // 渲染函数
    function render() {
      renderer.render(scene, camera); //执行渲染操作
    }
    render();
    //创建控件对象  相机对象camera作为参数   控件可以监听鼠标的变化,改变相机对象的属性
    const controls = new THREE.OrbitControls(camera,renderer.domElement);
    //监听鼠标事件,触发渲染函数,更新canvas画布渲染效果
    controls.addEventListener('change', render);
  </script>

</body>

</html>