一、进阶理解
主要核心:
- 渲染与响应式关系
- 渲染与编译模板关系
- 渲染与 vdom 关系
1. 如何理解 MVVM
组件化
数据驱动视图
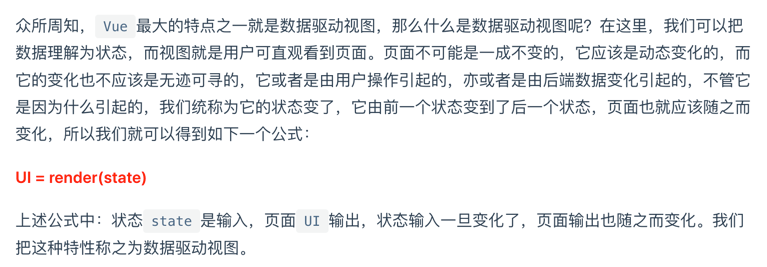
MVVM
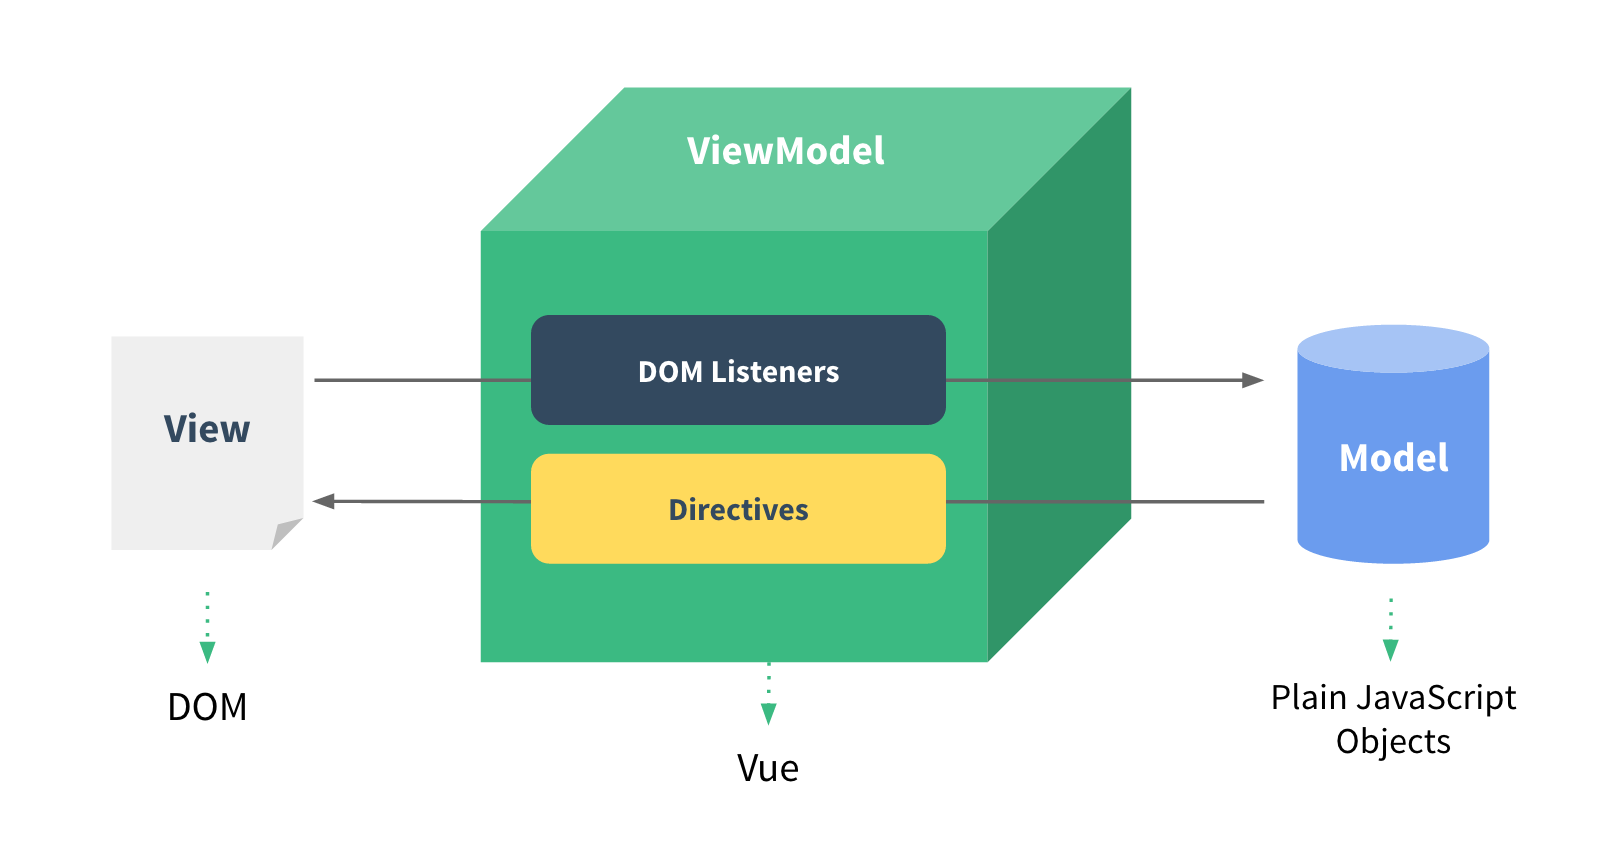

2. vue 响应式
- 组件 data 的数据一旦变化,立刻触发视图的更新
- 实现数据驱动视图的第一步
- 核心 API - Object.defineProperty
- Object.defineProperty 的一些缺点
- 深度监听,需要递归到底,一次性计算量大
- 无法金婷新增属性、删除属性(Vue.set Vue.delete)
- 无法原生监听数组,需要特殊处理
- 具体参看
3. 虚拟 DOM(Virtual DOM) 和 diff
vdom
- 用 JS 模拟 DOM 结构,计算出最小的变更,操作 DOM
- DOMhtml
<div id="div1" class="container"> <p>vdom</p> <ul style="font-size: 20px"> <li>a</li> </ul> </div> - DOM 结构json5
{
  tag: 'div',
  props: {
      className: 'container',
      id: 'div1'
  },
  children: [
    {
      tag: 'p',
      children: 'vdom'
    },
    {
      tag: 'ul',
      props: {
        style: 'font-size: 20px'
      },
      children: [
        {
          tag: 'li',
          children: 'a'
        }
      ]
    }
  ]
}
- DOM
- 用 JS 模拟 DOM 结构,计算出最小的变更,操作 DOM
Vue 参考 snabbdom 实现 vdom 和 diff
树 diff 的时间复杂度 O(n^3)
- 遍历 tree1,遍历 tree2
- 排序
- 1000个节点,要计算 1亿次
优化时间复杂度到 O(n)
- 只比较同一层级,不跨级比较
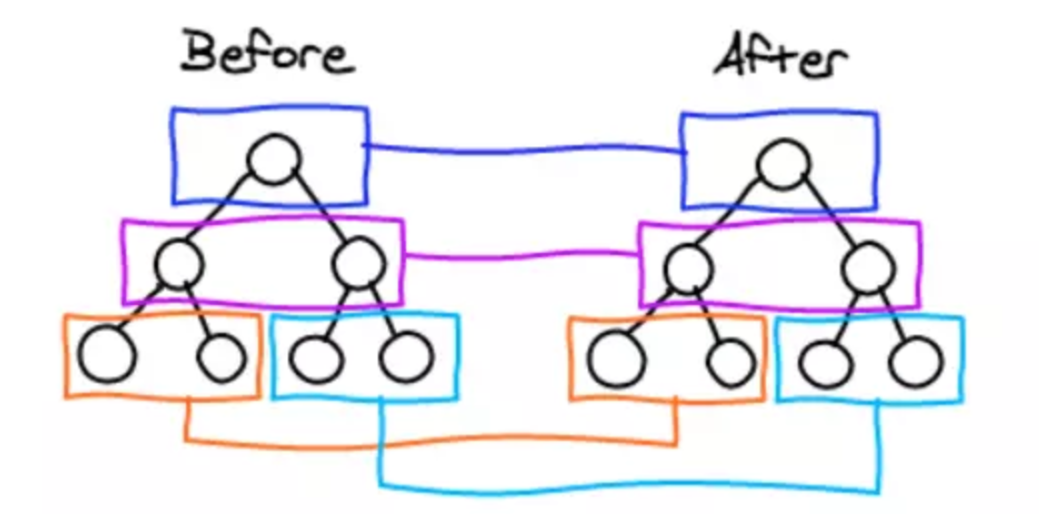
- tag 不相同,则直接删掉重建,不再深度比较
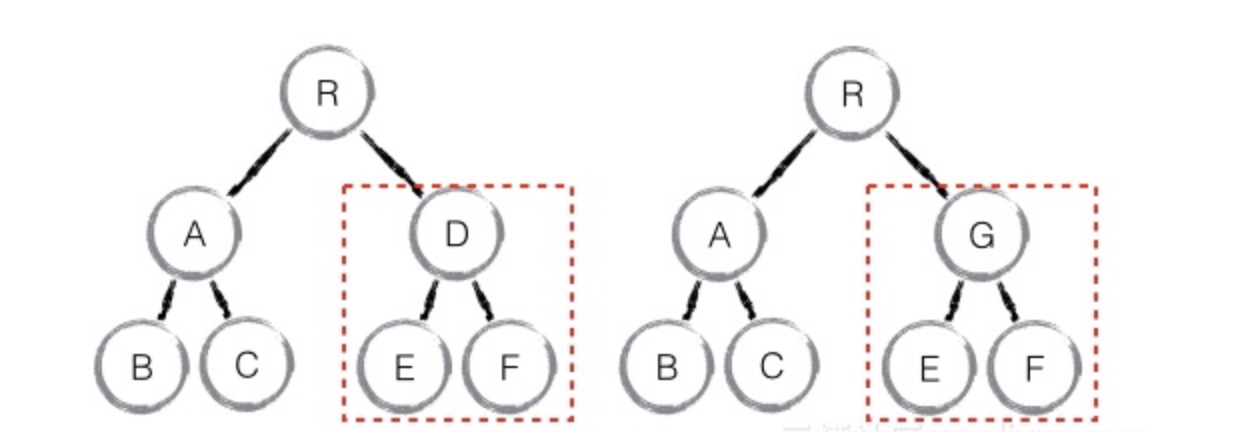
- tag 和 key,两者都相同,则认为是相同节点,不再深度比较。
- 只比较同一层级,不跨级比较
使用 key VS 不使用 key
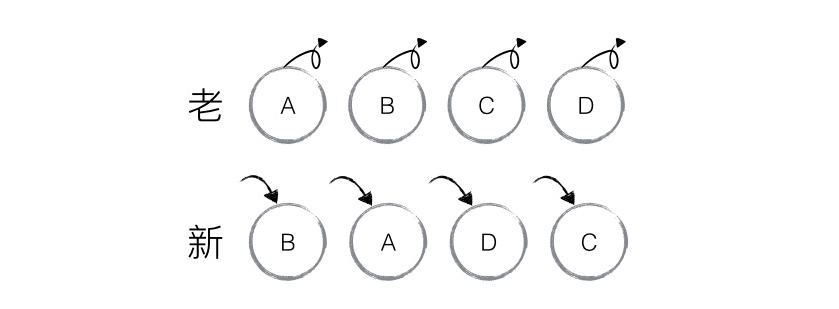
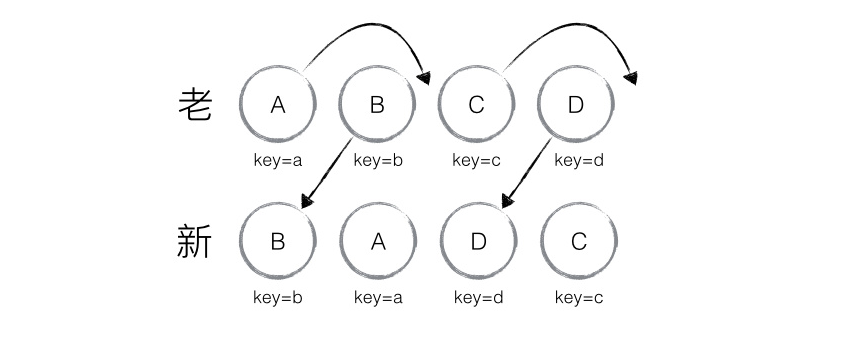
diff 算法总结
- patchVnode
- addVnodes removeVnodes
- updateChildren(key 重要性)
vnode 核心概念
- h
- vnode
- patch
- diff
- key
vnode 存在的价值
- 数据驱动视图
- 控制 DOM 操作
4. 模板编译
with 语法
- 改变 {} 内自由变量的查找规则,当做 obj 属性来查找
- 如果找不到匹配的 obj 属性,就会报错
- with 要慎用,它打破了作用域规则,易读性变差
编译模板
- 模板不是html,有指令、插值、JS表达式、能实现判断、循环
- html 是标签语言,只有 JS 才能实现判断、循环
- 因此,模板一定是转换为某种 JS 代码,即编译模板
安装
vue-template-compilerjsconst compiler = require('vue-template-compiler') // 插值 const template = `<p>{{message}}</p>` // 编译结果:with(this){return _c('p',[_v(_s(message))])} // 转化:with(this){return createElement('p',[createTextVNode(toString(message))])} // _c: createElement // h -> vnode // createElement -> vnode // 表达式 const template = `<p>{{flag ? message : 'no message found'}}</p>` // with(this){return _c('p',[_v(_s(flag ? message : 'no message found'))])} // 属性和动态属性 const template = ` <div id="div1" class="container"> <img :src="imgUrl"/> </div> ` // with(this){return _c('div', // {staticClass:"container",attrs:{"id":"div1"}}, // [ // _c('img',{attrs:{"src":imgUrl}})])} // 条件 const template = ` <div> <p v-if="flag === 'a'">A</p> <p v-else>B</p> </div> ` // with(this){return _c('div',[(flag === 'a')?_c('p',[_v("A")]):_c('p',[_v("B")])])} // 循环 const template = ` <ul> <li v-for="item in list" :key="item.id">{{item.title}}</li> </ul> ` // with(this){return _c('ul',_l((list),function(item){return _c('li',{key:item.id},[_v(_s(item.title))])}),0)} // 事件 const template = ` <button @click="clickHandler">submit</button> ` // with(this){return _c('button',{on:{"click":clickHandler}},[_v("submit")])} // v-model const template = `<input type="text" v-model="name">` // 主要看 input 事件 // with(this){return _c('input',{directives:[{name:"model",rawName:"v-model",value:(name),expression:"name"}],attrs:{"type":"text"},domProps:{"value":(name)},on:{"input":function($event){if($event.target.composing)return;name=$event.target.value}}})} // render 函数 // 返回 vnode // patch // 编译 const res = compiler.compile(template) console.log(res.render) // ---------------分割线-------------- // 从 vue 源码中找到缩写函数的含义 function installRenderHelpers (target) { target._o = markOnce target._n = toNumber target._s = toString target._l = renderList target._t = renderSlot target._q = looseEqual target._i = looseIndexOf target._m = renderStatic target._f = resolveFilter target._k = checkKeyCodes target._b = bindObjectProps target._v = createTextVNode target._e = createEmptyVNode target._u = resolveScopedSlots target._g = bindObjectListeners target._d = bindDynamicKeys target._p = prependModifier }总结
- 模板编译为 render 函数,执行 render 函数返回 vnode
- 基于 vnode 再执行 patch 和 diff
- 使用 webpack vue-loader,会在开发环境下编译模板
补充:vue 组件中使用 render 代替 template
vueVue.component('anchored-heading', { render: function (createElement) { return createElement( 'h' + this.level, // 标签名称 this.$slots.default // 子节点数组 ) }, props: { level: { type: Number, required: true } } })
5. 组件 渲染/更新 过程
- 回顾
- 响应式:监听 data 属性 getter setter (包括数组)
- 模板编译:模板到 render 函数,再到 vnode
- vdom:patch(elem, vnode) 和 patch(vnode, newVnode)
- 过程
- 初次渲染过程
- 解析模板为 render 函数
- 触发响应式,监听 data 属性 getter setter
- 执行 render 函数,生成 vnode,patch(elem, vnode)
- 更新过程
- 修改 data,触发 setter
- 重新执行 render 函数,生成 newVnode
- patch(vnode, newVnode)
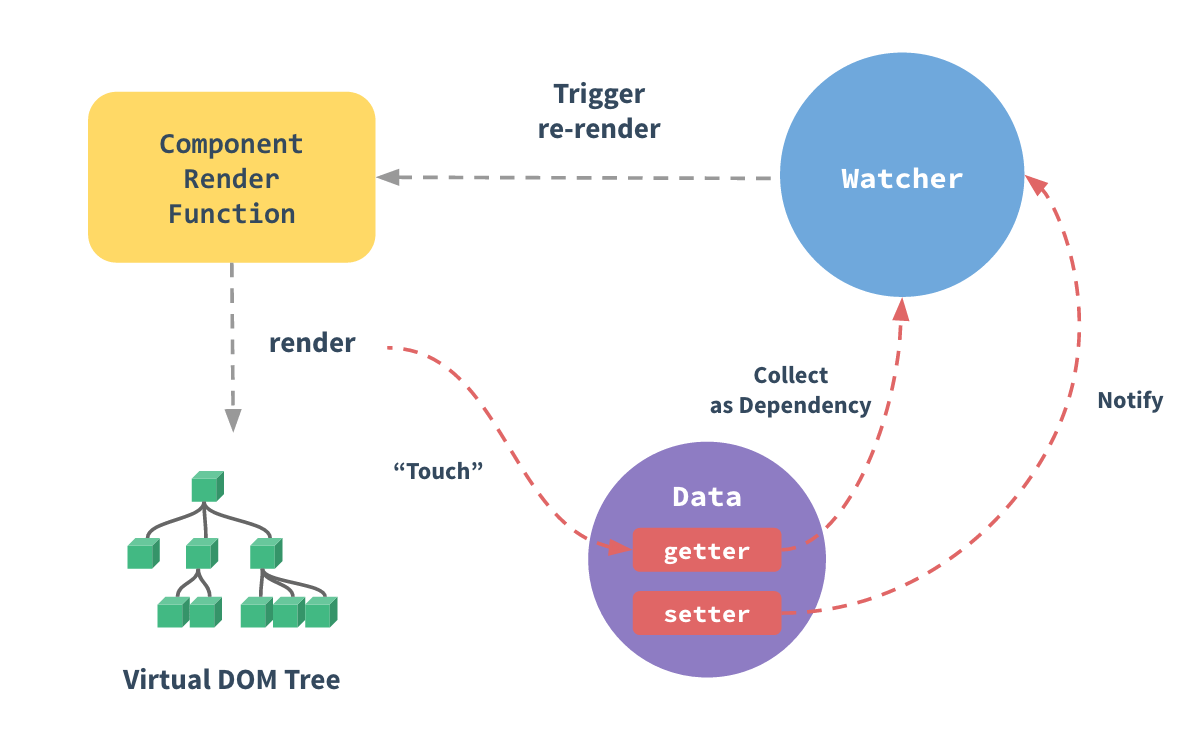
- 异步渲染
- $nextTick
- 汇总 data 的修改,一次性更新视图
- 减少 DOM 操作次数,提高性能
- 初次渲染过程
6. 路由原理
js
// http://127.0.0.1:8080/01-hash.html?a-100&b=200#/aa/bbb
location.protocol // 'http:'
location.hostname // '127.0.0.1'
location.host // '127.0.0.1:8080'
location.port // '8080'
location.pathname // '/01-hash.html'
location.search // '?a-100&b=200'
location.hash // '#/aa/bbb'
hash 的特点
- hash 变化会触发网页跳转,即浏览器的前进、后退
- hash 变化不会刷新新页面,SPA 必需的特点
- hash 永远不会提交到 server 端
- 演示:html
<!DOCTYPE html>
<html lang="en">
<head>
    <meta charset="UTF-8">
    <meta name="viewport" content="width=device-width, initial-scale=1.0">
    <meta http-equiv="X-UA-Compatible" content="ie=edge">
    <title>hash test</title>
</head>
<body>
    <p>hash test</p>
    <button id="btn1">修改 hash</button>

    <script>
        // hash 变化,包括:
        // a. JS 修改 url
        // b. 手动修改 url 的 hash
        // c. 浏览器前进、后退
        window.onhashchange = (event) => {
            console.log('old url', event.oldURL)
            console.log('new url', event.newURL)

            console.log('hash:', location.hash)
        }

        // 页面初次加载,获取 hash
        document.addEventListener('DOMContentLoaded', () => {
            console.log('hash:', location.hash)
        })

        // JS 修改 url
        document.getElementById('btn1').addEventListener('click', () => {
            location.href = '#/user'
        })
    </script>
</body>
</html>
H5 history
- 用 url 规范的路由,但跳转时不刷新新页面
- history.pushState
- window.onpopstate
- 演示html
<!DOCTYPE html>
<html lang="en">
<head>
    <meta charset="UTF-8">
    <meta name="viewport" content="width=device-width, initial-scale=1.0">
    <meta http-equiv="X-UA-Compatible" content="ie=edge">
    <title>history API test</title>
</head>
<body>
    <p>history API test</p>
    <button id="btn1">修改 url</button>

    <script>
        // 页面初次加载,获取 path
        document.addEventListener('DOMContentLoaded', () => {
            console.log('load', location.pathname)
        })

        // 打开一个新的路由
        // 【注意】用 pushState 方式,浏览器不会刷新页面
        document.getElementById('btn1').addEventListener('click', () => {
            const state = { name: 'page1' }
            console.log('切换路由到', 'page1')
            history.pushState(state, '', 'page1') // 重要!!
        })

        // 监听浏览器前进、后退
        window.onpopstate = (event) => { // 重要!!
            console.log('onpopstate', event.state, location.pathname)
        }

        // 需要 server 端配合,可参考
        // https://router.vuejs.org/zh/guide/essentials/history-mode.html#%E5%90%8E%E7%AB%AF%E9%85%8D%E7%BD%AE%E4%BE%8B%E5%AD%90
    </script>
</body>
</html>
总结
- hash - window.onhashchange
- H5 history - history.pushState 和 window.onpopstate
- H5 history 需要后端支持
- 两者选择
- to B 的系统推荐用 hash,简单易用,对 url 规范不敏感
- to C 的系统,可以考虑选择 H5 history,但需要服务端支持