第十二章:compiler 编译器 - 编译时核心设计原则
01:前言
从这一章开始我们就开始进入到编译器的学习。
编译器是一个非常复杂的概念,在很多语言中均有涉及。不同类型的编译器在实现技术上都会有较大的差异。
比如你要实现一个 java 或者 JavaScript 的编译器,那就是一个非常复杂的过程了。
但是对于我们而言,我们并不需要设计这种复杂的语言编辑器,我们只需要有一个 领域特定语言(DSL) 的编辑器即可。
DSL 并不具备很强的普适性,它是仅为某个适用的领域而设计的,但它也足以用于表示这个领域中的问题以及构建对应的解决方案。
那么我们这里所谓的特定语言指的就是:把 template 模板,编译成 render 函数。这个就是 vue 中 **编译器 compiler ** 的作用。
我们可以先创建一个测试实例 packages/vue/examples/imooc/compiler/compiler.html,以此来看一下 vue 中 compiler 的作用:
<script>
  const { compile } = Vue
  const template = `
      <div>hello world</div>
    `
  const renderFn = compile(template)

  console.log(renderFn);

</script>
查看最终的打印结果可以发现,最终 compile 函数把 template 模板字符串转化为了 render 函数。
那么我们可以借此来观察一下 compile 这个方法的内部实现。我们可以在 packages/compiler-dom/src/index.ts 中的 第40行 查看到该方法。
从代码中可以发现,compile 方法,其实是触发了 baseCompile 方法,那么我们可以进入到该方法。
该方法的代码比较简单,剔除掉无用的内容之后,可以得到如下内容:
export function baseCompile(
  template: string | RootNode,
  options: CompilerOptions = {}
): CodegenResult {

  // 1. 通过 parse 方法进行解析,得到 AST
  const ast = isString(template) ? baseParse(template, options) : template

	// 2. 通过 transform 方法对 AST 进行转化,得到 JavaScript AST
  transform(
    ast,
    extend({}, options, {
      prefixIdentifiers,
      nodeTransforms: [
        ...nodeTransforms,
        ...(options.nodeTransforms || []) // user transforms
      ],
      directiveTransforms: extend(
        {},
        directiveTransforms,
        options.directiveTransforms || {} // user transforms
      )
    })
  )

  // 3. 通过 generate 方法根据 AST 生成 render 函数
  return generate(
    ast,
    extend({}, options, {
      prefixIdentifiers
    })
  )
}这段代码(complie),主要做了三件事情:
- 通过
parse方法进行解析,得到AST - 通过
transform方法对AST进行转化,得到JavaScript AST - 通过
generate方法根据AST生成render函数
整体的代码解析,虽然比较清晰,但是里面涉及到的一些概念,我们可能并不了解。
比如:什么是 AST?
所以我们需要先花费一些时间,来了解编译器中的一些基础知识,然后再去阅读对应的源码和实现具体的逻辑。
那么本章节,我们就先来做第一件事情:了解编译时的基础知识。
02:模板编译的核心流程
我们知道,对于 vue 中的 compiler 而言,它的核心作用就是把 template模板 编译成 render 函数 ,那么在这样的一个编译过程中,它的一个具体流程是什么呢?这一小节我们来看一下。
从上一小节的源码中,我们可以看到 编译器 compiler 本身只是一段程序,它的作用就是:把 A 语言,编译成 B 语言。
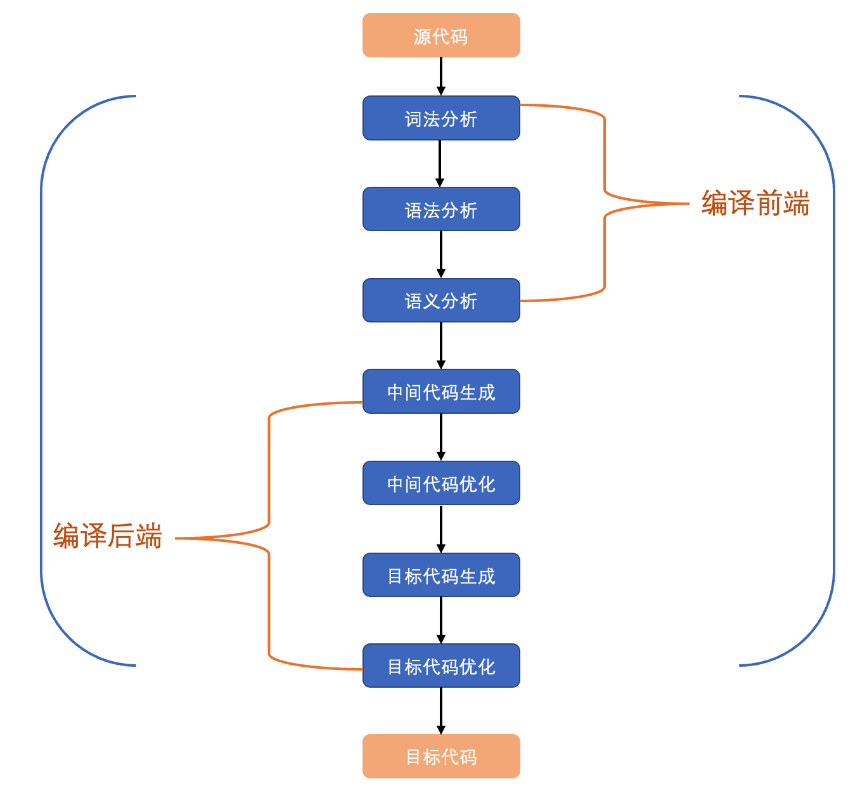
在这样的一个场景中 A 语言,我们把它叫做 源代码。而 B 语言,我们把它叫做 目标代码。整个的把源代码变为目标代码的过程,叫做 编译 compiler。
一个完整的编译过程,非常复杂,下图大致的描述了完整的编译步骤。

由图可知,一个完善的编译流程非常复杂。
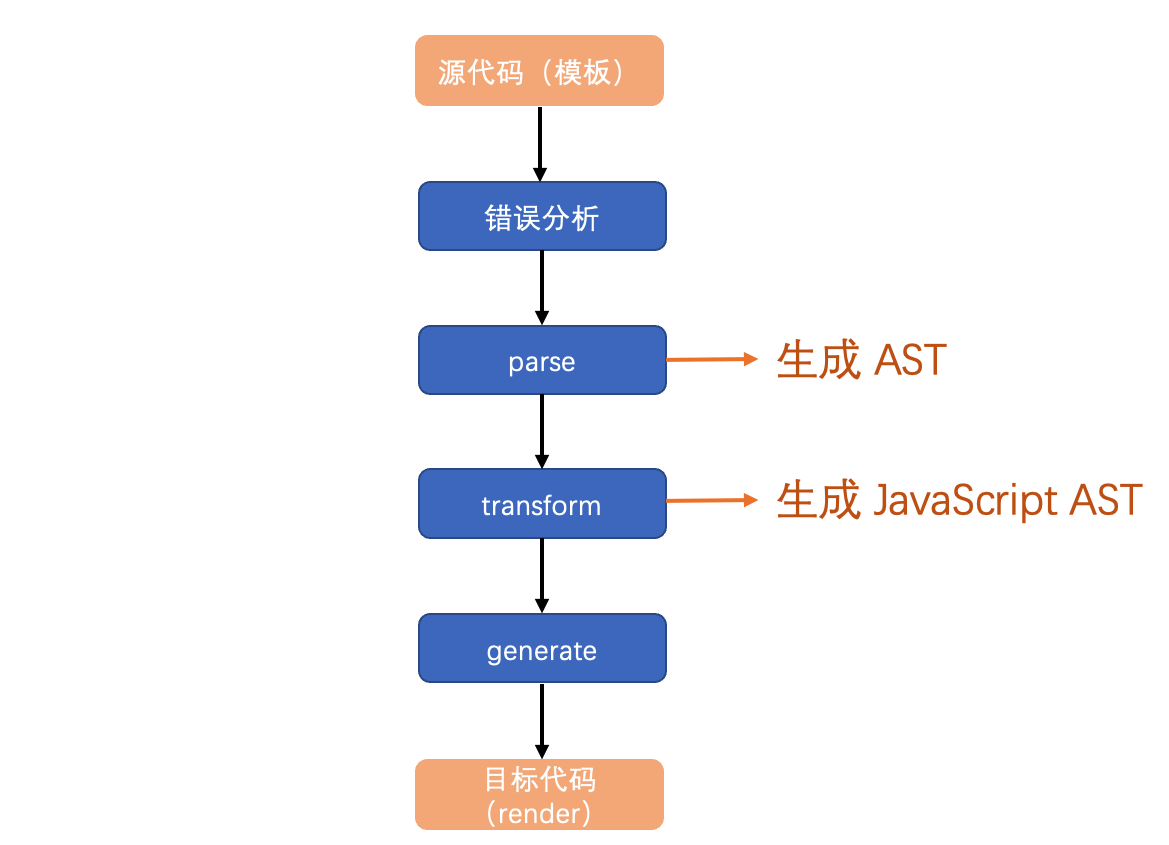
但是对于 vue 的 compiler 而言,因为他只是一个领域特定语言(DSL)编译器,所以它的一个编译流程会简化很多,如下图所示:

由上图可知,整个的一个编译流程,被简化为了 4 步。
其中的错误分析就包含了词法分析、语法分析。这个我们不需要过于关注。
我们的关注点只需要放到 parse、transform、generate 中即可。
03:抽象语法树 - AST
通过上一小节的内容,我们可以知道,利用 parse 方法可以得到一个 AST ,那么这个 AST 是什么东西呢?这一小节我们就来说一下。
抽象语法树(AST) 是一个用来描述模板的 JS 对象,我们以下面的模板为例:
<div v-if="isShow">
  <p class="m-title">hello world</p>
</div>
生成的 AST 为:
{
  "type": 0, // NodeTypes.ROOT
  "children": [
    {
      "type": 1, // NodeTypes.ELEMENT
      "ns": 0,
      "tag": "div",
      "tagType": 0,
      "props": [
        {
          "type": 7, // NodeTypes.DIRECTIVE
          "name": "if",
          "exp": {
            "type": 4, // NodeTypes.SIMPLE_EXPRESSION
            "content": "isShow",
            "isStatic": false,
            "constType": 0,
            "loc": {
              "start": { "column": 12, "line": 2, "offset": 12 },
              "end": { "column": 18, "line": 2, "offset": 18 },
              "source": "isShow"
            }
          },
          "modifiers": [],
          "loc": {
            "start": { "column": 6, "line": 2, "offset": 6 },
            "end": { "column": 19, "line": 2, "offset": 19 },
            "source": "v-if=\"isShow\""
          }
        }
      ],
      "isSelfClosing": false,
      "children": [
        {
          "type": 1, // NodeTypes.ELEMENT
          "ns": 0,
          "tag": "p",
          "tagType": 0,
          "props": [
            {
              "type": 6, // NodeTypes.ATTRIBUTE
              "name": "class",
              "value": {
                "type": 2, // NodeTypes.TEXT
                "content": "title",
                "loc": {
                  "start": { "column": 12, "line": 3, "offset": 32 },
                  "end": { "column": 19, "line": 3, "offset": 39 },
                  "source": "\"title\""
                }
              },
              "loc": {
                "start": { "column": 6, "line": 3, "offset": 26 },
                "end": { "column": 19, "line": 3, "offset": 39 },
                "source": "class=\"title\""
              }
            }
          ],
          "isSelfClosing": false,
          "children": [
            {
              "type": 2, // NodeTypes.ELEMENT
              "content": "hello world",
              "loc": {
                "start": { "column": 20, "line": 3, "offset": 40 },
                "end": { "column": 31, "line": 3, "offset": 51 },
                "source": "hello world"
              }
            }
          ],
          "loc": {
            "start": { "column": 3, "line": 3, "offset": 23 },
            "end": { "column": 35, "line": 3, "offset": 55 },
            "source": "<p class=\"title\">hello world</p>"
          }
        }
      ],
      "loc": {
        "start": { "column": 1, "line": 2, "offset": 1 },
        "end": { "column": 7, "line": 4, "offset": 64 },
        "source": "<div v-if=\"isShow\">\n  <p class=\"title\">hello world</p>  \n</div>"
      }
    }
  ],
  "helpers": [],
  "components": [],
  "directives": [],
  "hoists": [],
  "imports": [],
  "cached": 0,
  "temps": 0,
  "loc": {
    "start": { "column": 1, "line": 1, "offset": 0 },
    "end": { "column": 5, "line": 5, "offset": 69 },
    "source": "\n<div v-if=\"isShow\">\n  <p class=\"title\">hello world</p>  \n</div>\n    "
  }
}
对于以上这段 AST 而言,内部包含了一些关键属性,需要我们了解:
type:这里的type对应一个enum类型的数据NodeTypes,表示 当前节点类型。比如是一个ELEMENT还是一个指令NodeTypes可在packages/compiler-core/src/ast.ts中进行查看25 行
children:表示子节点loc:loction内容的位置start:开始位置end:结束位置source:原值
注意: 不同的
type类型具有不同的属性值:NodeTypes.ROOT -- 0:根节点- 必然包含一个
children属性,表示对应的子节点
- 必然包含一个
NodeTypes.ELEMENT -- 1:DOM节点tag:标签名称tagType:标签类型,对应ElementTypesprops:标签属性,是一个数组
NodeTypes.DIRECTIVE -- 7:指令节点节点name:指令名modifiers:修饰符exp:表达式type:表达式的类型,对应NodeTypes.SIMPLE_EXPRESSION, 共有如下类型:SIMPLE_EXPRESSION:简单的表达式COMPOUND_EXPRESSION:复合表达式JS_CALL_EXPRESSION:JS调用表达式JS_OBJECT_EXPRESSION:JS对象表达式JS_ARRAY_EXPRESSION:JS数组表达式JS_FUNCTION_EXPRESSION:JS函数表达式JS_CONDITIONAL_EXPRESSION:JS条件表达式JS_CACHE_EXPRESSION:JS缓存表达式JS_ASSIGNMENT_EXPRESSION:JS赋值表达式JS_SEQUENCE_EXPRESSION:JS序列表达式
content:表达式的内容
NodeTypes.ATTRIBUTE -- 6:属性节点name:属性名value:属性值
NodeTypes.TEXT -- 2:文本节点content:文本内容
由以上的 AST 解析可知:
- 所谓的
AST抽象语法树本质上只是一个对象 - 不同的属性下,有对应不同的选项,分别代表了不同的内容。
- 每一个属性都详细描述了该属性的内容以及存在的位置
- 指令的解析也包含在
AST中
所以我们可以说:AST 描述了一段 template 模板的所有内容 。
04:AST 转化为 JavaScript AST ,获取 codegenNode
在上一小节中,我们大致了解了抽象语法树 AST 对应的概念。同时我们也知道,AST 最终会通过 transform 方法转化为 JavaScript AST。
那么 JavaScript AST 又是什么样子的呢?这一小节我们来看一下。
我们知道:compiler 最终的目的是吧 template 转化为 render 函数。而整个过程分为三步:
- 生成
AST - 将
AST转化为JavaScript AST - 根据
JavaScript AST生成render
所以,生成 JavaScript AST 的目的就是为了最终生成渲染函数最准备的。
上一小节的测试案例,过于复杂,得到的 JavaScript AST 会变得难以理解。所以我们将创建一个新的测试实例,来看一下 JavaScript AST
创建 packages/vue/examples/imooc/compiler/compiler-2.html:
<script>
  const { compile, h, render } = Vue
  // 创建 template
  const template = `<div>hello world</div>`

  // 生成 render 函数
  const renderFn = compile(template)

  // 创建组件
  const component = {
    render: renderFn
  }

  // 通过 h 函数,生成 vnode
  const vnode = h(component)

  // 通过 render 函数渲染组件
  render(vnode, document.querySelector('#app'))
</script>
以上代码将得到如下的 AST 和 JavaScript AST:
// AST
{
  "type": 0,
  "children": [
    {
      "type": 1,
      "ns": 0,
      "tag": "div",
      "tagType": 0,
      "props": [],
      "isSelfClosing": false,
      "children": [
        {
          "type": 2,
          "content": "hello world",
          "loc": {
            "start": { "column": 6, "line": 1, "offset": 5 },
            "end": { "column": 17, "line": 1, "offset": 16 },
            "source": "hello world"
          }
        }
      ],
      "loc": {
        "start": { "column": 1, "line": 1, "offset": 0 },
        "end": { "column": 23, "line": 1, "offset": 22 },
        "source": "<div>hello world</div>"
      }
    }
  ],
  "helpers": [],
  "components": [],
  "directives": [],
  "hoists": [],
  "imports": [],
  "cached": 0,
  "temps": 0,
  "loc": {
    "start": { "column": 1, "line": 1, "offset": 0 },
    "end": { "column": 23, "line": 1, "offset": 22 },
    "source": "<div>hello world</div>"
  }
}// JavaScript AST
{
"type": 0,
"children": [
{
"type": 1,
"ns": 0,
"tag": "div",
"tagType": 0,
"props": [],
"isSelfClosing": false,
"children": [
{
"type": 2,
"content": "hello world",
"loc": {
"start": { "column": 6, "line": 1, "offset": 5 },
"end": { "column": 17, "line": 1, "offset": 16 },
"source": "hello world"
}
}
],
"loc": {
"start": { "column": 1, "line": 1, "offset": 0 },
"end": { "column": 23, "line": 1, "offset": 22 },
"source": "<div>hello world</div>"
},
"codegenNode": {
"type": 13,
"tag": "\"div\"",
"children": {
"type": 2,
"content": "hello world",
"loc": {
"start": { "column": 6, "line": 1, "offset": 5 },
"end": { "column": 17, "line": 1, "offset": 16 },
"source": "hello world"
}
},
"isBlock": true,
"disableTracking": false,
"isComponent": false,
"loc": {
"start": { "column": 1, "line": 1, "offset": 0 },
"end": { "column": 23, "line": 1, "offset": 22 },
"source": "<div>hello world</div>"
}
}
}
],
"helpers": [xxx, xxx],
"components": [],
"directives": [],
"hoists": [],
"imports": [],
"cached": 0,
"temps": 0,
"codegenNode": {
"type": 13,
"tag": "\"div\"",
"children": {
"type": 2,
"content": "hello world",
"loc": {
"start": { "column": 6, "line": 1, "offset": 5 },
"end": { "column": 17, "line": 1, "offset": 16 },
"source": "hello world"
}
},
"isBlock": true,
"disableTracking": false,
"isComponent": false,
"loc": {
"start": { "column": 1, "line": 1, "offset": 0 },
"end": { "column": 23, "line": 1, "offset": 22 },
"source": "<div>hello world</div>"
}
},
"loc": {
"start": { "column": 1, "line": 1, "offset": 0 },
"end": { "column": 23, "line": 1, "offset": 22 },
"source": "<div>hello world</div>"
}
}对于两段内容,其实我们可以发现,两段内容的大多数是完全相同的,唯一不同的地方就是 codegenNode 属性,我们把该属性拿出来单独看一下:
{
  ...
  "children": [
    {
      ...
      // 代码生成节点
      "codegenNode": {
        "type": 13, // NodeTypes.VNODE_CALL
        "tag": "\"div\"", // 标签
        "children": { // 子节点
          "type": 2, // NodeTypes.TEXT
          "content": "hello world", // 内容
          "loc": { // 位置
            "start": { "column": 6, "line": 1, "offset": 5 },
            "end": { "column": 17, "line": 1, "offset": 16 },
            "source": "hello world"
          }
        },
        "isBlock": true, // 块元素
        "disableTracking": false, // 不禁用跟踪
        "isComponent": false, // 不是组件
        "loc": {
          "start": { "column": 1, "line": 1, "offset": 0 },
          "end": { "column": 23, "line": 1, "offset": 22 },
          "source": "<div>hello world</div>"
        }
      }
    }
  ],
  ...
  // 与上面相同
  "codegenNode": {
    "type": 13,
    "tag": "\"div\"",
    "children": {
      "type": 2,
      "content": "hello world",
      "loc": {
        "start": { "column": 6, "line": 1, "offset": 5 },
        "end": { "column": 17, "line": 1, "offset": 16 },
        "source": "hello world"
      }
    },
    "isBlock": true,
    "disableTracking": false,
    "isComponent": false,
    "loc": {
      "start": { "column": 1, "line": 1, "offset": 0 },
      "end": { "column": 23, "line": 1, "offset": 22 },
      "source": "<div>hello world</div>"
    }
  },
  "loc": {...}
}
那么由以上对比可以发现,对于 当前场景下 的 AST 与 JavaScript AST ,相差的就只有 codegenNode 这一个属性。
那么这个 codegenNode 是什么呢?
codegenNode 是 代码生成节点。根据我们之前所说的流程可知:JavaScript AST 的作用就是用来 生成 render 函数。
那么生成 render 函数的关键,就是这个 codegenNode 节点。
那么在这一小节我们知道了:
AST转化为JavaScript AST的目的是为了最终生成render函数- 而生成
render函数的核心,就是多出来的codegenNode节点 codegenNode节点描述了如何生成render函数的详细内容
05:JavaScript AST 生成 render 函数代码
在上一小节我们已经成功了拿到了对应的 JavaScript AST,那么接下来我们就根据它生成对应的 render 函数。
我们知道利用 render 函数可以完成对应的渲染,根据我们之前了解的规则,render 必须返回一个 vnode。
例如,我们想要渲染这样的一个结构:<div>hello world</div>,那么可以构建这样的 render 函数:
render() {
  return h('div', 'hello world')
}
那么上一小节同样的案例,我们来看看:
const template = `<div>hello world</div>这样的一个 template,最终生成的 render 函数是什么?
还是上一小节的例子:
<script>
  const { compile, h, render } = Vue
  // 创建 template
  const template = `<div>hello world</div>`

  // 生成 render 函数
  const renderFn = compile(template)

  // 打印 renderFn
  console.log(renderFn.toString());

  // 创建组件
  const component = {
    render: renderFn
  }

  // 通过 h 函数,生成 vnode
  const vnode = h(component)

  // 通过 render 函数渲染组件
  render(vnode, document.querySelector('#app'))
</script>
打印其中的 renderFn 函数:
function render(_ctx, _cache) {
  with (_ctx) {
    const { openBlock: _openBlock, createElementBlock: _createElementBlock } = _Vue

    return (_openBlock(), _createElementBlock("div", null, "hello world"))
  }
}
对于以上代码,存在一个 with 语法,这个语法是一个 不被推荐 的语法,我们无需太过于关注它,只需要知道它的作用即可:
摘自:《JavaScript 高级程序设计》
with语句的作用是:将代码的作用域设置到一个特定的对象中…由于大量使用
with语句会导致性能下降,同时也会给调试代码造成困难,因此在开发大型应用程序时,不建议使用with语句。
我们可以把该代码(render)略作改造,直接应用到 render 的渲染中:
<script>
  const { compile, h, render } = Vue
  // 创建组件
  const component = {
    render: function (_ctx, _cache) {
      with (_ctx) {
        const { openBlock: _openBlock, createElementBlock: _createElementBlock } = Vue // 把 _Vue 改为 Vue

        return (_openBlock(), _createElementBlock("div", null, "hello world"))
      }
    }
  }

  // 通过 h 函数,生成 vnode
  const vnode = h(component)

  // 通过 render 函数渲染组件
  render(vnode, document.querySelector('#app'))
</script>
发现可以得到与:
render() {
  return h('div', 'hello world')
}
同样的结果。
那么观察两个 render 可以发现:
compiler最终生成的render函数,与我们自己的写的render会略有区别。- 它会直接通过
createElementBlock来渲染 块级元素 的方法,比h函数更加 “精确” - 同时这也意味着,生成的
render函数会触发更精确的方法,比如:createTextVNodecreateCommentVNodecreateElementBlock- …
- 它会直接通过
- 虽然,生成的
render更加精确,但是本质的逻辑并没有改变,已然是一个:return vnode进行render的过程。
06:总结
在本章我们讲解了 compiler 的整体编译设计原则。
我们知道,整个 compiler 的过程,就是一个把:源代码(template)转化为目标代码(render 函数) 的过程。
在这个过程中,主要经历了三个大的步骤:
- 解析(
parse)template模板,生成AST - 转化(
transform)AST,得到JavaScript AST - 生成(
generate)render函数
这三步是非常复杂的一个过程,内部的实现涉及到了非常复杂的计算方法,并且会涉及到一些我们现在还没有了解过得概念,比如:自动状态机。
这些内容我们都会放到下一章进行讲解,本章我们只需要知道 compiler 的作用,以及三大步骤即可都在干什么即可。